

Introduction
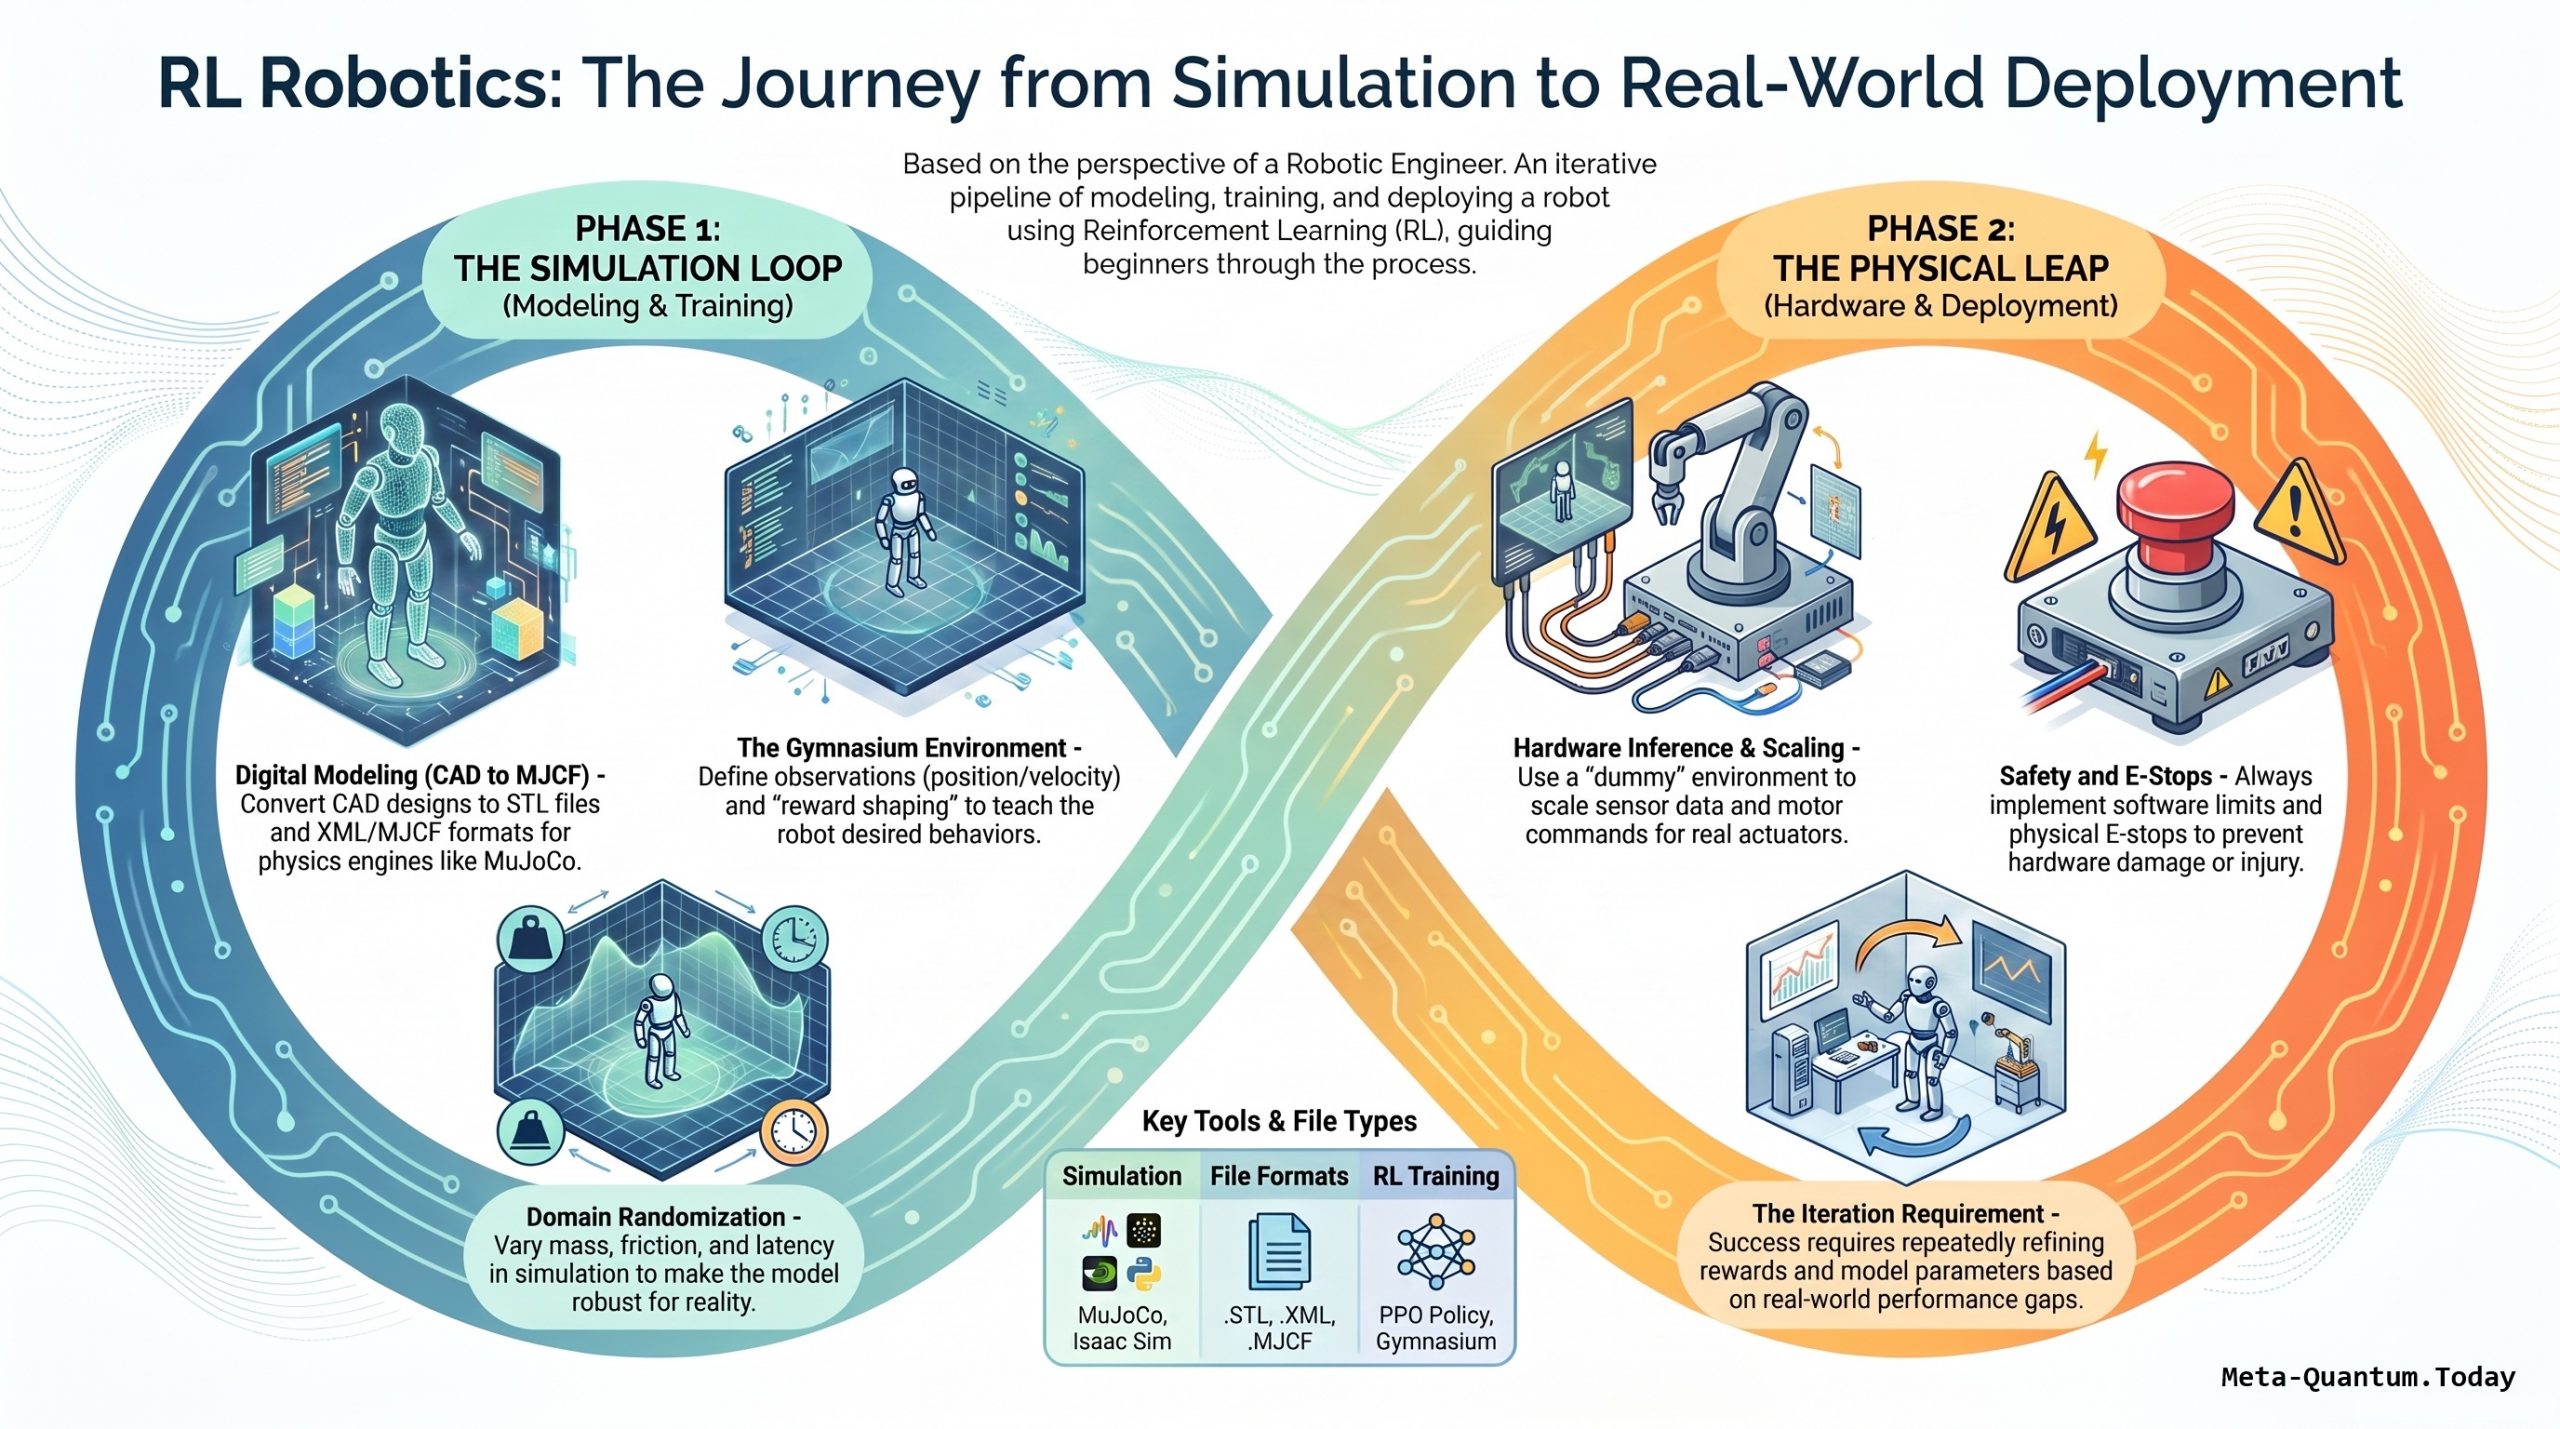
The video below is one of the clearest end-to-end walkthroughs I’ve seen of the reinforcement learning (RL) pipeline for robotics — going from CAD modeling all the way to hardware deployment. Rather than treating “model → train → deploy” as a straight line, the creator makes an important point up front: this pipeline is iterative. You will bounce back and forth between modeling, training, and deployment as you debug why your controller isn’t behaving as expected. The demonstration system is a rotary inverted pendulum — a classic, low-dimensional benchmark — but the creator is explicit that every concept scales up to quadrupeds and humanoids.
The video is structured around three phases: Modeling (MuJoCo, CAD/STL, XML/MJCF, frames, motor parameters, torque vs. position control), Training (Gymnasium, PPO policy networks, domain randomization, rewards/observations/termination), and Deployment (ONNX export, sensors, control loops, real-hardware safety). Understanding the vocabulary and how each block connects to the next is the real value here — it’s the difference between guessing and being able to diagnose why a controller isn’t converging or transferring to hardware.
Installing, Setting Up, and Configuring MuJoCo and Gymnasium
A practical setup guide for getting a reinforcement-learning-for-robotics environment running from scratch — the foundation layer before you get into modeling, training, and deployment.
Before you can build a custom Gymnasium environment around a MuJoCo model, you need a clean, working install of both libraries. This is one of those steps that looks trivial but quietly eats hours if version mismatches or missing system dependencies get in the way — especially since MuJoCo has changed its Python bindings and licensing model significantly over the years (it’s now free and open-source, maintained by DeepMind/Google, and ships its own Python bindings directly via pip — no separate license key or mjkey.txt required anymore).
This guide walks through installation, environment setup, and basic configuration so you can go from a blank machine to rendering your first MuJoCo scene inside a Gymnasium environment.
Prerequisites
- Python 3.9–3.12 (a virtual environment is strongly recommended)
- pip up to date (
pip install --upgrade pip) - A GPU is not required for MuJoCo itself (it’s CPU-based physics), but helps significantly if you’re also running PPO training with large batch sizes or image-based observations
- On Linux, a few system libraries for rendering (GLFW/OpenGL) — usually already present, but see troubleshooting below if you hit rendering errors
Step 1: Create an Isolated Environment
Keeping RL projects in their own environment avoids dependency conflicts between MuJoCo, Gymnasium, and training libraries like Stable-Baselines3.
bash
# Using venv
python -m venv rl-robotics-env
source rl-robotics-env/bin/activate      # Linux/macOS
rl-robotics-env\Scripts\activate         # Windows

# Or using conda
conda create -n rl-robotics python=3.11
conda activate rl-robotics
Step 2: Install MuJoCo
Modern MuJoCo installs as a pure Python package — no separate binary download needed.
bash
pip install mujoco
Verify the install and check the version:
bash
python -c "import mujoco; print(mujoco.__version__)"
To confirm rendering works, MuJoCo ships a quick interactive viewer:
bash
python -m mujoco.viewer
This should open a window with MuJoCo’s default demo scene. If it fails to open a window, see the Troubleshooting section below — this is almost always a graphics/display driver issue, not a Python problem.
Step 3: Install Gymnasium
Gymnasium is the actively maintained successor to OpenAI Gym, and is the standard interface for wrapping custom environments for RL training.
bash
pip install gymnasium
If you plan to use MuJoCo’s built-in Gymnasium environments (e.g., HalfCheetah-v5, Ant-v5) rather than only a fully custom one, install the MuJoCo extras:
bash
pip install "gymnasium[mujoco]"
Sanity-check with a built-in environment:
python
import gymnasium as gym

env = gym.make("HalfCheetah-v5", render_mode="human")
obs, info = env.reset()
for _ in range(200):
    action = env.action_space.sample()
    obs, reward, terminated, truncated, info = env.step(action)
    if terminated or truncated:
        obs, info = env.reset()
env.close()
If a window opens and the HalfCheetah flails around randomly, your install is working correctly.
Step 4: Install Supporting Libraries
For actually training policies on top of your environment (PPO, as used in most sim-to-real robotics pipelines):
bash
pip install stable-baselines3[extra]
pip install torch          # if not already installed as a dependency
pip install numpy matplotlib
stable-baselines3[extra] also pulls in TensorBoard, which is useful for watching reward curves during training without writing your own plotting code.
Step 5: Set Up Your Project Structure
A layout that scales cleanly as your custom environment grows:
rl-robotics-project/
├── models/
│   ├── robot.xml          # MJCF model file
│   └── meshes/             # STL files referenced by robot.xml
├── envs/
│   └── custom_env.py       # your gym.Env subclass
├── train.py                 # PPO training script
├── deploy.py                 # inference / hardware deployment script
└── policies/                 # saved model weights (.zip, .onnx)
Loading a custom MJCF model inside a custom environment looks like this:
python
import gymnasium as gym
import mujoco
import numpy as np

class CustomRobotEnv(gym.Env):
    def __init__(self, xml_path="models/robot.xml"):
        super().__init__()
        self.model = mujoco.MjModel.from_xml_path(xml_path)
        self.data = mujoco.MjData(self.model)

        self.action_space = gym.spaces.Box(
            low=-1.0, high=1.0, shape=(self.model.nu,), dtype=np.float32
        )
        self.observation_space = gym.spaces.Box(
            low=-np.inf, high=np.inf,
            shape=(self.model.nq + self.model.nv,), dtype=np.float32
        )

    def _get_obs(self):
        return np.concatenate([self.data.qpos, self.data.qvel]).astype(np.float32)

    def reset(self, seed=None, options=None):
        super().reset(seed=seed)
        mujoco.mj_resetData(self.model, self.data)
        mujoco.mj_forward(self.model, self.data)
        return self._get_obs(), {}

    def step(self, action):
        self.data.ctrl[:] = action
        mujoco.mj_step(self.model, self.data)
        obs = self._get_obs()
        reward = 0.0          # define your reward function here
        terminated = False    # define your termination condition here
        truncated = False
        return obs, reward, terminated, truncated, {}
Configuration Tips
- Rendering backend: MuJoCo defaults to GLFW for the interactive viewer. On headless servers (e.g., training on a remote GPU box with no display), set
MUJOCO_GL=eglorMUJOCO_GL=osmesaas an environment variable before running, so it uses an offscreen renderer instead of failing on missing display. - Timestep and solver settings: These live in the
<option>tag of your MJCF file (timestep,integrator,solver). Smaller timesteps improve accuracy but slow down training — a common tuning trade-off. - Parallel environments: For faster PPO training, wrap multiple instances of your environment using
gymnasium.vector.AsyncVectorEnvor Stable-Baselines3’smake_vec_env, so you’re stepping many environments in parallel per training iteration. - Version pinning: Pin
mujocoandgymnasiumversions in arequirements.txtonce your project is working — MuJoCo’s Python API has had breaking changes between major versions, and a working environment can silently stop reproducing results after an unplanned upgrade.
mujoco==3.2.4
gymnasium==0.29.1
stable-baselines3==2.3.2
Troubleshooting
| Symptom | Likely Cause | Fix |
|---|---|---|
| Viewer window won’t open | Missing display / headless environment | Set MUJOCO_GL=egl or run with a virtual display (xvfb-run) |
ImportError: libGL.so.1 | Missing system OpenGL libs (Linux) | apt install libgl1-mesa-glx libglfw3 |
Env registered but gym.make() fails | Missing gymnasium[mujoco] extras | pip install "gymnasium[mujoco]" |
| Simulation explodes / NaNs | Timestep too large, or bad initial conditions | Reduce timestep in <option>, check joint limits and initial qpos |
Custom env reset() signature error | Using old Gym API instead of Gymnasium’s | Gymnasium’s reset() must return (obs, info), and step() must return 5 values (obs, reward, terminated, truncated, info) |
The Key Trips of MuJoCo and Gymnasium
- MuJoCo today installs cleanly via
pip install mujoco— no license files, no separate binaries. - Gymnasium is the modern standard interface; install the
[mujoco]extras if you want access to built-in benchmark environments alongside your custom one. - A clean project structure (models/envs/train/deploy separation) pays off quickly once you start iterating on rewards and domain randomization.
- Headless rendering (
MUJOCO_GL) and version pinning are the two setup details most likely to bite you later — get them right early. - Gymnasium’s 5-value
step()return signature (terminatedandtruncatedare separate) is a common source of bugs if you’re following older Gym-based tutorials or code.
Video about RL for Robotics
Features and Core Concepts
1. Modeling — Building the Digital Twin
- CAD → STL → XML/MJCF pipeline: The robot is designed in CAD software (SolidWorks, though Onshape/FreeCAD work too), exported as STL for visualization, then wired into MuJoCo’s XML (MJCF) format.
- XML structure: A MuJoCo model file has a predictable skeleton — model name, gravity settings,
<asset>(STL meshes),<worldbody>(links), and<actuator>(motors). - Links and joints: Links are defined inside
worldbody; joints (typicallytype="hinge") sit between links and define rotation axes — getting these directions right is critical, since any misalignment cascades into simulation errors. - Control modes: MuJoCo actuators support torque control and position control. Custom controllers can be layered on top of the torque output.
- Frame alignment: Body position and quaternion values must be checked visually against the real robot’s coordinate frames — this is a common silent source of bugs.
- Motor parameters: Friction loss, damping, and armature values ideally come from actuator datasheets, but often require empirical tuning. Geometry density also affects mass/inertia properties.
- MuJoCo vs. Isaac Sim: MuJoCo is chosen for being lightweight and easy to get started with, versus NVIDIA’s Isaac Sim as a heavier alternative.
2. Training — Teaching the Policy
- Gymnasium environment: A custom environment class inherits from
gym.Envand implementsget_observation,get_reward,reset,step,render, andclose. - Observations: Can combine joint data (position, velocity, current, torque), IMU data (orientation, angular velocity, linear acceleration), end-effector data (pose, velocity, force/torque), and other signals (object position, error, time, images).
- Reward shaping: Built from a weighted sum of bonuses (position tracking, upright orientation, velocity tracking, survival/balance, task completion) minus penalties (control effort, velocity, action smoothness, collision, joint limits). The creator is candid that reward shaping is trial-and-error and often the actual root cause when a model “looks good” on the reward graph but fails visually during inference.
- Reset logic: Triggered at episode termination; determines the robot’s starting state (random or fixed position/velocity), followed by an
mj_forwardcall. - Step function: Applies (scaled) torque commands, steps the MuJoCo physics, then returns updated observations, rewards, and termination flags.
- Domain randomization: Randomizing mass, inertia, friction, damping, actuator strength, sensor noise, and latency during training is key to robust zero-shot sim-to-real transfer — and it’s done entirely in code, no CAD changes needed.
- PPO training loop: Using Stable-Baselines3, the environment is wrapped, an MLP policy PPO model is instantiated, and training is essentially one line:
model.learn(total_timesteps=...). Reward-vs-timestep curves are used to evaluate convergence — but the creator stresses that a promising graph doesn’t guarantee good inference behavior, so visual/hardware validation is non-negotiable.
3. Deployment — From Simulation to Hardware
- A “dummy” gym environment: Reused deployment-side to handle observation formatting and action scaling/clipping, since real actuators may accept different units (e.g., current vs. torque) than the simulation.
- ONNX conversion: For deployment on MCUs or lightweight hardware, trained PyTorch policies are exported via
torch.onnx.export, with careful verification that scaling behaves identically post-conversion. - Real-world sensor handling: Encoders, IMUs, force/torque sensors, and cameras each need calibration, noise filtering, and correct unit conversion. Communication protocols (EtherCAT, SPI, CAN) and timing/synchronization/latency issues all show up here that never appear in simulation.
- Safety first: E-stops and software safety limits are explicitly called out as non-negotiable — mistakes on hardware can cause physical harm, unlike simulation.
- Result: The rotary inverted pendulum ran for almost four minutes under external disturbances (including water and manual taps), despite minimal domain randomization on mass — a solid proof that the sim-to-real pipeline worked.
Setup, Configuration and Examples
A simplified reproduction path, following the video’s structure:
1. Modeling
   - Design robot in CAD (SolidWorks / Onshape / FreeCAD)
   - Export links as STL
   - Build MJCF (XML): <asset>, <worldbody> (links + joints), <actuator>
   - Choose control mode: torque ("motor") or position ("position")
   - Verify frame alignment (body pos + quaternion) visually
   - Tune motor params: frictionloss, damping, armature, geom density

2. Training (Gymnasium + Stable-Baselines3 + PPO)
   class RotaryPendulumEnv(gym.Env):
       def get_observation(self): ...   # pull self.data.qpos, qvel
       def get_reward(self): ...        # height - velocity_penalty, etc.
       def reset(self): ...             # random/init state + mj_forward
       def step(self, action): ...      # scale torque, mj_step, return obs/reward/done

   env = RotaryPendulumEnv(xml_path="model.xml")
   model = PPO("MlpPolicy", env, learning_rate=..., ...)
   model.learn(total_timesteps=1_000_000)
   model.save("trained_policy")

   # Apply domain randomization inside reset():
   #   randomize mass, damping, torque scaling, sensor noise

3. Deployment
   - Export: torch.onnx.export(policy, dummy_input, "policy.onnx")
   - Build a "dummy" gym wrapper for real hardware I/O
   - Control loop: read sensors -> build observation -> predict action
                    -> scale/clip -> send to actuator (torque/current)
   - Add e-stop + software safety limits BEFORE running on real hardware
Key debugging heuristic from the video: if reward graphs look good but real/inferred behavior is poor, the problem is almost always in reward architecture, not the training algorithm — iterate on reward shaping before touching hyperparameters.
Conclusion and Key Takeaways
- The RL-for-robotics pipeline (model → train → deploy) is not linear — expect to loop back constantly, and understanding each stage’s terminology is what lets you diagnose failures efficiently.
- Modeling accuracy (frame alignment, motor parameters, control mode) is the foundation; small misalignments compound into simulation errors that are hard to trace later.
- Reward shaping is the real bottleneck in training — good-looking learning curves can still produce bad real-world behavior, so always validate visually.
- Domain randomization is a low-cost, code-only technique that materially improves zero-shot sim-to-real transfer.
- Hardware deployment introduces an entirely new problem class: unit conversions, sensor noise, communication protocols, timing/latency — and above all, safety (e-stops, software limits) must be treated as mandatory, not optional.
- These exact concepts (modeling → gym environment → PPO → ONNX → hardware loop) generalize directly to more complex systems like quadrupeds and humanoids — the rotary pendulum is a deliberately simple teaching example.
References
- MuJoCo documentation — https://mujoco.readthedocs.io/
- MuJoCo GitHub — https://github.com/google-deepmind/mujoco
- Gymnasium documentation — https://gymnasium.farama.org/
- Gymnasium GitHub — https://github.com/Farama-Foundation/Gymnasium
- Stable-Baselines3 documentation — https://stable-baselines3.readthedocs.io/
